

by David Turton
Making transparent gradients in Illustrator have become much easier with the new Gradient Annotator, a new tool in Adobe's Illustrator CS4. It is now possible to define the opacity if individual color stops in a gradient, revealing underlying objects and colors, and creating multiple layered compositions.
The process of creating these gradients have become exact- set the gradient angle, position and dimensions while previewing the effect directly on your artboard.

Step 1.
The process of creating these gradients have become exact- set the gradient angle, position and dimensions while previewing the effect directly on your artboard.

Step 1.
Using the circle shape tool from the tool bar make a circle holding the “shift” key which will help constrain proportions.

Step 2.

Step 2.
Using the gradient tool and the default gradient blend drag from the center and get close to the edge, but don’t go past it, that is very important in this process.

Step 3.

Step 3.
With the circle shape still selected use the gradient tool and just touch the area that you want the highlight to pinch toward. You can aim it in any direction you want but for this project you will need it to aim at the top. Once you get this correct you can remove the stroke from the shape if yours has one.

Step 4.

Step 4.
With the shape selected go ahead and drag whatever two colors you want to use, one at a time, and replace the black and white colors already in place. We will be adding a third color to the gradient shortly.

Step 5.

Step 5.
You can make nearly any shape you want but the more simple you keep it the cleaner the glossy look will appear. Try to keep the shape you make with the pen tool move away from the center like the shape above shows. Keep your color choice in the same color family and a bit darker, but not much darker than your darkest color in your shape for this exercise. Unless you’re very aware of color harmonies, just stick to this for now.

Step 6.

Step 6.
Using the shape tool make an oval and place it near the top of the circle shape and color it white. This is where we will get into gradient transparency blends available in CS4 that does not require transparency masking. Make sure your shape is centered with the background circle for this.

Step 7.

Step 7.
Apply a gradient to the new oval shape and make both colors white. Using other colors, such as black, will have some odd coloring effects when blending to a Zero (0) opacity over another color. So for the highlight just keep it white. Go ahead and set one of the white swatches to an opacity of 0. As you can see in the screenshot provided for this I’ve circled the important areas. Be sure to have the blend direct face downward.

Step 8.

Step 8.
At this stage you will need to add a third color to help with the reflection. You can also do this at Step 4 but you can choose for yourself. Using the Direct selection tool move the darker color over to the left a bit and add a lighter swatch of your choice by dragging a swatch color from the swatch palette and dropping it on the gradient bar. At this point you can experiment a bit with color if you choose. Just keep in mind that your reflection shape on the lower part of the ball will need to blend into what ever color you choose.

Step 9.

Step 9.
I’ve adjusted my main gradient a bit so the lighter reflection would be closer to the edge of the ball. Also, I’ve applied my gradient to the reflective shape on the ball to achieve a better and cleaner color transition. This helps convey more depth. At this stage you can add an oval shape behind your shape and set up for the shadow. This will help with the appearance of 3D. Try to make the center of the shadow touch the bottom circle. By lowering it you can also give the appearance that it’s floating.

Step 10.

Step 10.
In CS4 there is a new tool for gradient call “ Gradient Annotator ” which will pop up when you use the gradient tool. If it doesn’t show up when using look for it under View> Show Gradient Annotator. The handle on this tool will function a few of ways. As you can see in the screenshot the anchor area on the right, also showing my direction of the gradient, will expand the gradient proportionally either in or out. The anchor on top will compress the gradient downward to for an oval gradient. Using this tool and saving it to a legacy file can sometimes have some unwanted effects such as stepped shape gradients or rasterizing. If you choose to save it down it’s best to close the file then reopen it and check on any visual or structural changes. Be sure to check the file in “outline” mode which can be found under the view menu.

Step 11.

Step 11.
In this step you can see the finished result of the use of the Gradient Annotator.

Step 12.

Step 12.
Adding the details. You can see that I’ve added two minor light reflections at the top and I’m in the process of making the finger holes. Using the Shape tool make a two circles, one offset a bit from the other. The angle will be your choice depending on where you want the holes to be placed.

Step 13.

Step 13.
Using the Pathfinder palette. By selecting both circles and clicking on the “divide” button in the Pathfinder palette I was able to cut and remove the unnecessary part of the finger hole.

Step 14.

Step 14.
After copying and pasting two more finger holes, I used the same gradient that is in the ball and converted in to a linear gradient then applied it to the shapes. Select the three holes and get ready to tweak the perspective using the Free Transform tool.
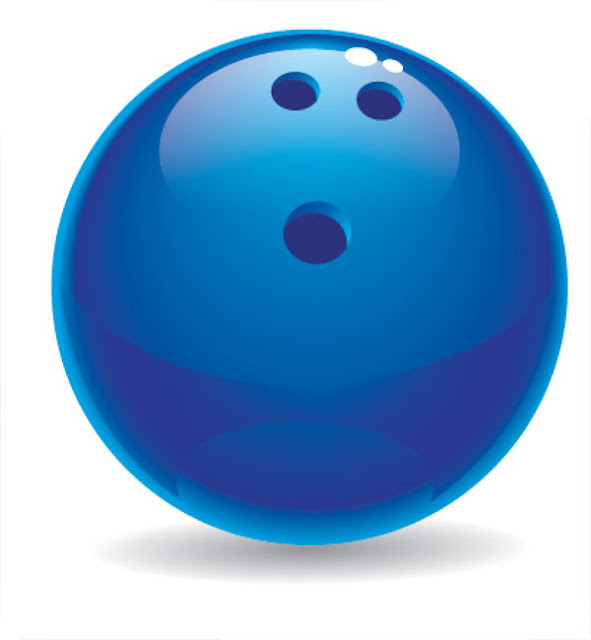
Step 15.

Step 15.
Finished piece. After playing with the Free Transform tool a bit you should be able to get the correct angle you need to finish this piece out nicely. Keep in mind that this is a simple shape to do this with so I hope to add a few more complex versions of this example soon.
Source
Source
digitalapplejuice.com
See also
See also
Σχόλια
Δημοσίευση σχολίου